Friday, July 31, 2015
I'm Back, Baby! Plus a Giveaway!


I have included several types of transportation: bus rider, car rider, walker, after school care, YCare (YMCA), biker, and daycare. The BEST thing about these bracelets is that they are editable. Yep! You read that right - they are editable so you can personalize the bracelets to the kinds of transportation you have available at your school! Or heck, maybe you don't like what font I used - feel free to change it!
All you need when you download this file is PowerPoint and a few free fonts from KG Fonts. When you're ready, simply copy each type of transportation bracelet that you need (I use different colors for each type) and then cut them with the paper cutter. Simply wrap around students wrist and staple. When we line up, it's super easy to visually see if everyone is in the right line!
Before the first day of school, I send out an email to the school staff explaining how the bracelets work. That way, if they find a roaming kinder, they can point them in the right direction. We use these bracelets for at least the first week of school and possibly the second week if I feel that some kiddos are having trouble remembering their ride home.
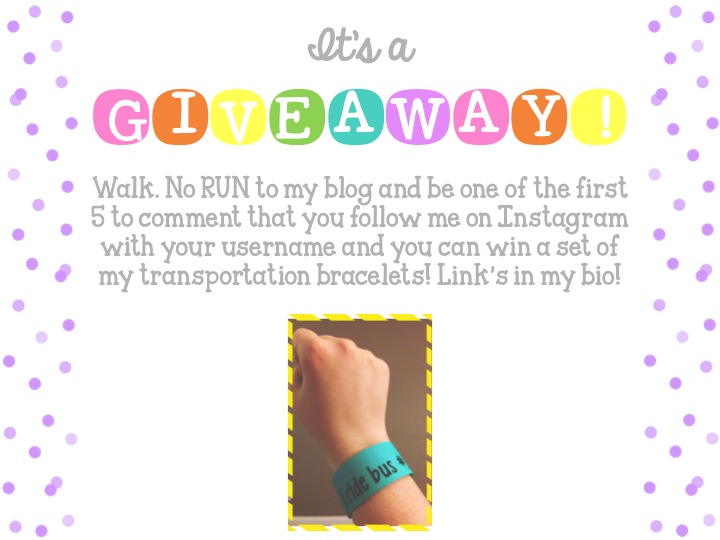
Here's the fun part: I'm giving away a set of transportation bracelets to the first 5 people that comment below that they follow me on Instagram at theteachingnest. Be sure to leave me your Instagram username and an email address where I can send your transportation bracelets!
If you're not lucky enough to be one of the first 5 winners, you can find my transportation bracelets on Teachers Pay Teachers or Teachers Notebook.

Monday, June 30, 2014
Saturday, November 12, 2011
How Many Seeds in a Pumpkin?
 Last week, our classroom finished up a 3 day science project on pumpkins to introduce plants to students. I found this 5 Es lesson in the Science and Children journal archives at NSTA.org. Written by Karen Ansberry and Emily Morgan, authors of Picture-Perfect Science Lessons, this hands-on lesson encorporates math and science into an engaging, real-life experience for students.
 On the first day, students made predictions as to which pumpkins would have the most seeds (mini, small, medium, or large). I used cheap dot stickers (like the ones used at garage sales) to have students mark their predictions on a graph (Hello, math skills!). We then hung this graph up and discussed our results. After graphing, we read the first few pages of the picture book, How Many Seeds in a Pumpkin? We then spent the rest of the day in groups scooping out seeds from our pumpkins. It was messy, but lots of fun!
 After the seeds dried overnight, we read a few more pages of the story and students spent the next day deciding the most effective way to count their seeds. After counting by 2s, 5s, or 10s, students wrote their total number outside their pumpkins. We finished reading How Many Seeds and discussed the different variables that determine what makes a pumpkin have more seeds than others (I'll leave those as a surprise for when you read the story!).
 Finally, I followed up the lesson by having students write down other questions they had on sentence strips. We then discussed how scientists categorize their questiosn into two categories: researchable and testable. Students shared their questions and categorized each one into their categories.
Sunday, September 25, 2011
Fantasy & Realism Bingo!
 Last week I wrapped up a week of exploring Fantasy & Realism in books during Reader's Workshop. After brainstorming for a VERY long period of time (and ending up with a headache), I decided to wrap up the week by having students play Fantasy & Realism BINGO.
I made a generic BINGO board, copied it, and had the kids fill in their own spaces (Bonus: they practiced spelling fantasy & realism!).
Bingo Template
When they were finished, I grabbed a tub of books out of our classroom library and showed them the title and cover.

From there I asked them to determine if they thought the book was fantasy or realism and place a token on the corresponding square. When someone had BINGO, I checked their answers and then we reviewed what our answers should have been (I had several winners each round). I had NO idea how much the kids would enjoy playing! They even asked to play during recess!
Sunday, July 17, 2011
Picture-Perfect Science, Part 2
 My week with the Picture-Perfect Science authors is over. :( Although I did learn some cool stuff from Karen and Emily, unfortunately, I cannot share the pages from the books with you (darn copyright, laws!). However, I do have some pictures to share of a lab we tried!
 When using this lesson in your classroom, begin by engaging students with the picture book Popcorn! by Elaine Landau (You can also use Tomie dePaola's The Popcorn Book with this lesson).
  Next, explore and explain by completing the "What's Poppin'?" lab. This step is followed by elaborating with the brand test, and finally, evaluating with a popcorn poster. I can't begin to tell you how much fun this lab is! It fits in really well with introducing lab safety and instructing how to design an experiment.
Monday, July 11, 2011
Picture-Perfect Science, Part 1
 Some of you might remember the exciting news I posted about in April when I found out that I was selected to participate in a grant that provides 3-years of science professional development to several districts in our area. Today was the first day of our 2-week summer institute - Woohoo!
  This week, our guest speakers are the authors Karen Ansberry and Emily Morgan. Known for their books, Picture-Perfect Science Lessons and More Picture-Perfect Science Lessons, Ansberry and Morgan wrote ready-to-teach, inquiry-based lessons that include the 5Es (engage, explore, explain, elaborate, and evaluate). What I really love about their books is that I can read quality picture books to students while discussing reading strategies and science topics at the same time (and we all wish we had more time for science and social studies instruction!).
Thanks for stopping by!
Tuesday, July 5, 2011
Favorite Fonts Linky Party!!